Sales Navigator can be a really complicated tool to use. especially when managing large lead lists.
If you’re struggling with lead organization or optimizing your outreach, you’re in the right place.
Did you know that one of Sales Navigator’s strongest features is its ability to handle large lead lists, particularly through CSV uploads?
In this blog, we’ll break down everything you need to know about uploading, managing, and leveraging lead lists in Sales Navigator.
Let’s begin.

Without further ado, let's get started! By the time you finish this article, you’ll know:
👉 How to upload and manage your lead list in Sales Navigator?
👉 How to share, export, and start messaging your leads?
👉 The benefits of uploading lead lists to Sales Navigator
👉 Other advanced features that make Sales Navigator a game-changer
Why Use Sales Navigator for Lead Management?
Sales Navigator makes finding and managing leads so much easier.
It gives you all the important data about your prospects from their LinkedIn profile.
So you can tell what they do, what they care about, and what they might need.
This helps you send messages that actually makes sense to them instead of generic, boring pitches.
Key Benefits of Using Sales Navigator:
1️⃣ Lead enrichment:
Upload and enrich lead data with their LinkedIn profile URLs and their info.
This helps segment leads by industry, job roles, or geography for better targeting.
2️⃣ Real-Time Updates:
Stay informed with automatic updates on job changes, promotions, or any professional moves tied to LinkedIn profiles.
3️⃣ Team Collaboration:
Share access with your team, enabling smooth coordination and a more efficient workflow.
By addressing the search intent upfront and then diving deeper, you ensure readers find exactly what they’re looking for while providing additional value.
How to upload Lead Lists to Sales Navigator?
It’s quite simple, all you need to do is:
- Get your CSV file ready with the right information, such as names, contact info, and social media handles.
- Head over to “Accounts” > “Account lists” and “Upload Accounts”.

- This will bring you to the Upload account list window. Navigate and find the location of the CSV file on your system and upload it. Make sure you carefully read everything in the “Requirements” tab.
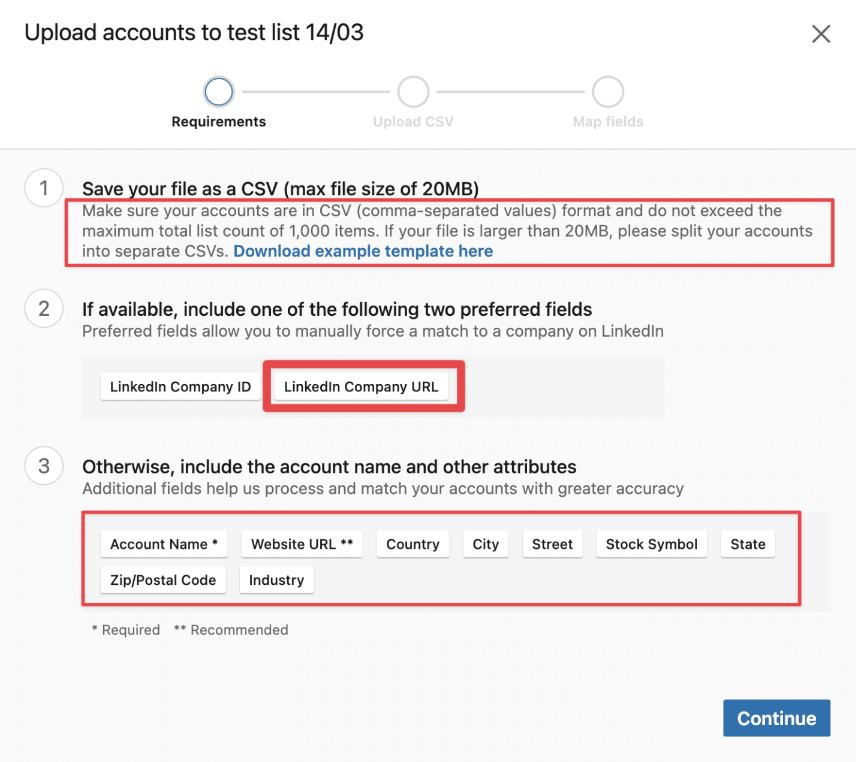
Don’t miss out on any details. If you add more details, LinkedIn is more likely to match your CSV with the right companies.
- Once that's done, make sure to map the headers of your CSV file to the LinkedIn accounts field.
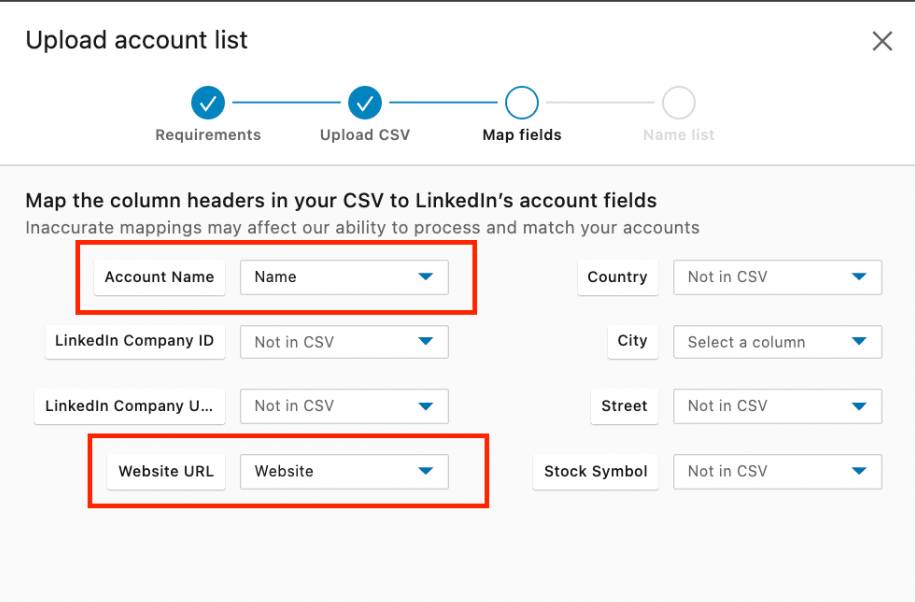
- Sales Navigator will now proceed to automatically process and start adding leads to your list.

Once this is done, you will see a “CSV” tag next to your list’s name.
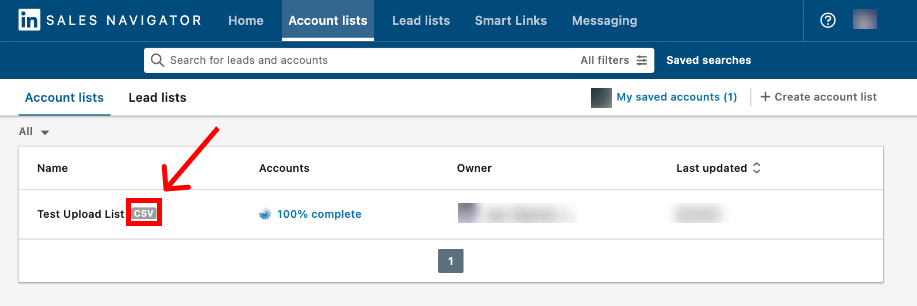
It’s that simple.

The number of lead lists you can manage on Sales Navigator completely depends on the type of subscription you have.
Pro Tips:
- Avoid duplicate entries by cleaning your data beforehand.
- Add as much information as possible to improve LinkedIn’s matching accuracy.
- If the upload fails, check for mismatched headers or unsupported formats.
How to Export Lead Lists from Sales Navigator and Start Messaging Them?
Uploaded your lead list to Sales Navigator? Great!
Now your list looks complete.
Now, it’s time to start engaging with these leads.
After uploading your lead list, the next step is outreach.
While Sales Navigator doesn’t allow direct exporting, here’s how you can do it:
Manual Copy-Paste Method
Yep, you can manually copy and paste each lead into an Excel file. Once it’s all noted down, you can start texting them one by one.
But let’s be real, that's tedious and eats up a ton of time. Plus, when it comes to messaging, sending the same message to too many people can get you flagged 🚩.
Sure, you could hire a team to handle it, but that can get pricey fast.
Using a Third-Party Application
There are plenty of third-party tools like SalesRobot, Evaboot, and PhantomBuster that let you export your lead list to a CSV file.
But here’s the big question… “Which one’s actually worth it?”
And this is where SalesRobot stands out.
With SalesRobot, you can not only export your leads into a CSV file but also set up automated messages and email sequences 😎.
That’s like hitting two birds with one stone.
Oh, and it even handles follow-up messages for you because let’s be honest, those can be a pain to keep track of.
Lemme show you how it works real quick so you know I’m not just hyping it up 💀.
Before you do anything, though, you gotta link your LinkedIn account to SalesRobot. I’ll show you how. If you’ve already done it, then skip to Step 3.
Step 1: Click on “Accounts” and “Add LinkedIn account”.
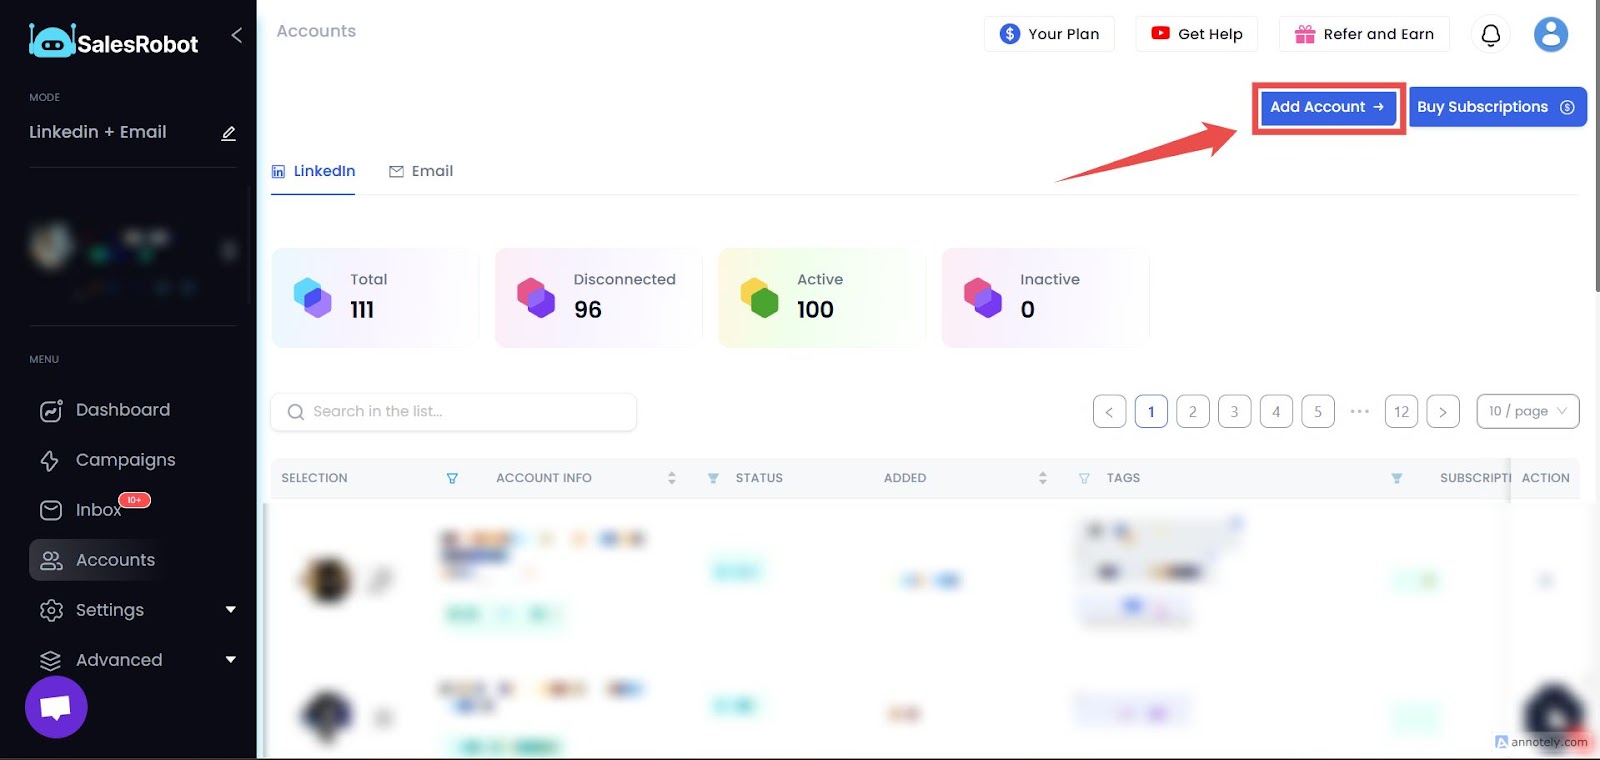

Step 2: Enter your LinkedIn Email ID and Password and click on “Add account”.

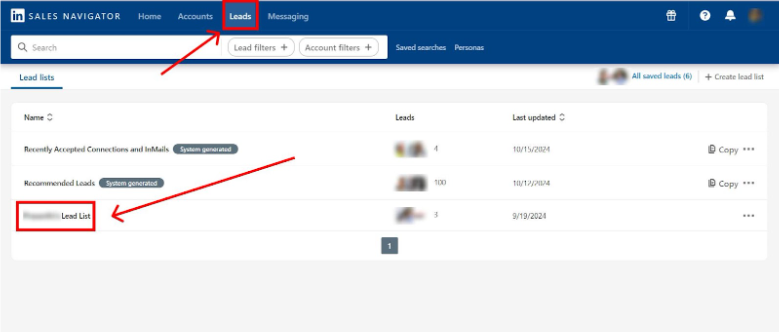
Step 3: Open Sales Navigator, head over to the “Leads” section and select your lead list.
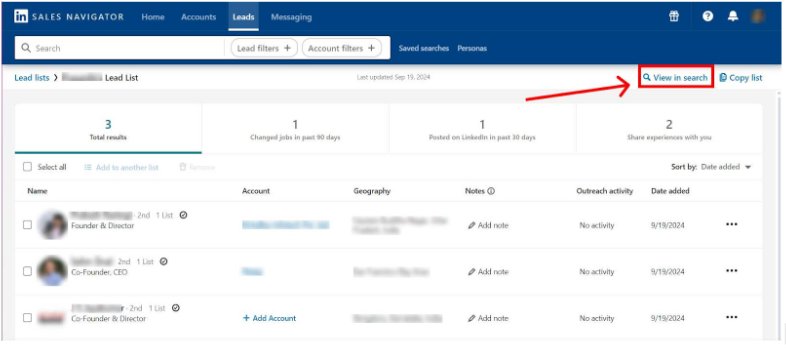
Step 4: Click on “View in search” to be able to access the search URL.
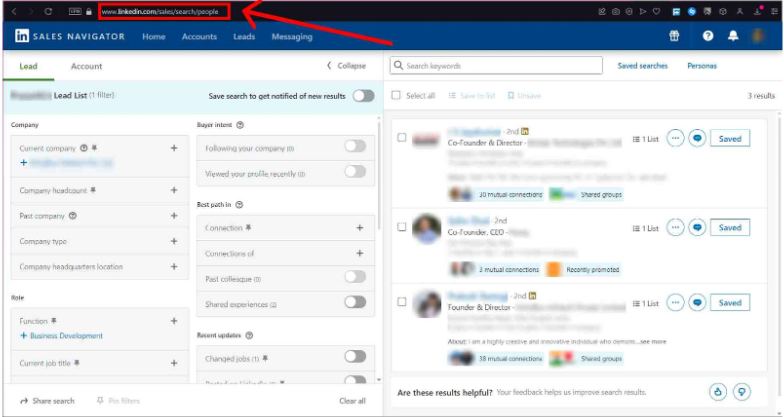
Step 5: Now copy the Sales Navigator URL.
Step 6: Head over to SalesRobot and create a campaign.

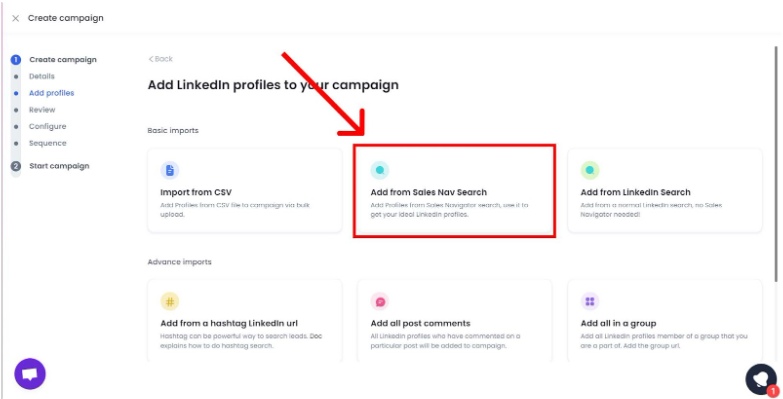
Step 7: Now click on “Add from Sales Nav Search”
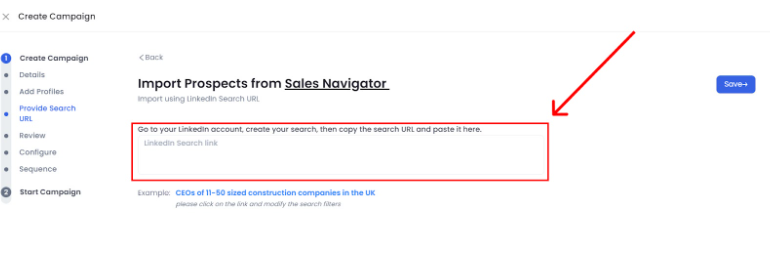
Step 8: Paste the link you had copied earlier and save it.
Step 9: Once that's done, click on configure settings.
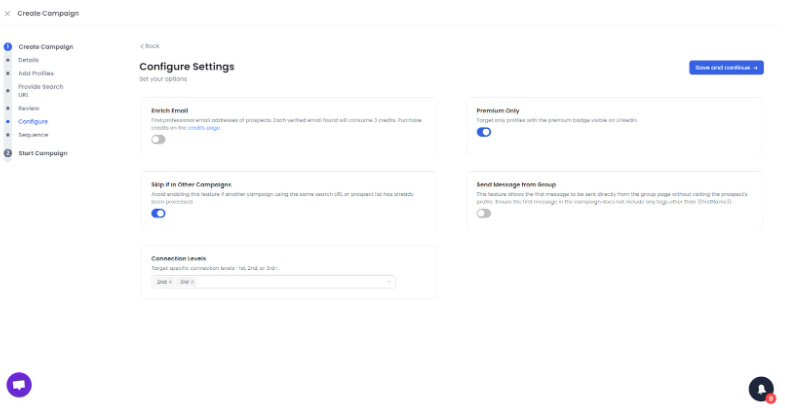
(Here, you will find options to enrich emails and also targeting only premium accounts)
Step 10: You can choose from our pre-made templates or even start the message sequence from scratch.
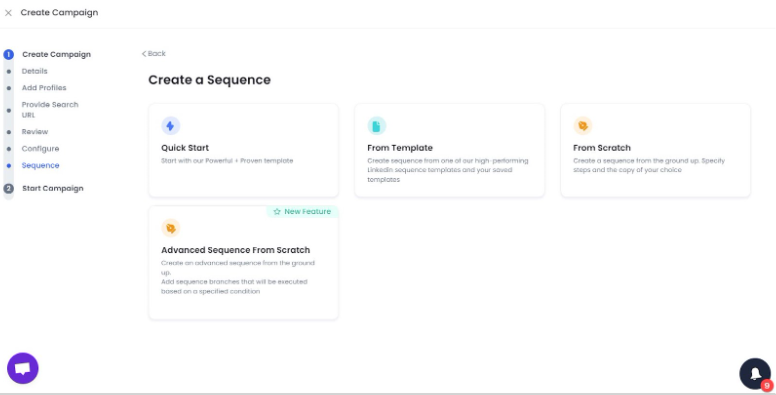
Step 11: Let’s get to the fun part!
You’ve got two options here:
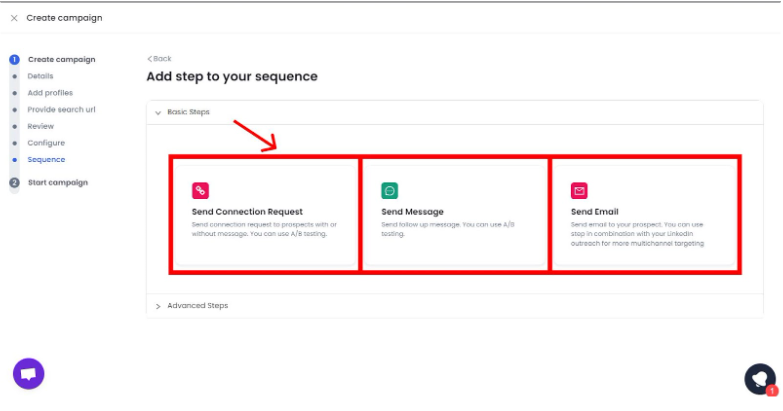
- If you go with “Basic Steps,” you can automate sending a connection request, followed by a message, and then emails.
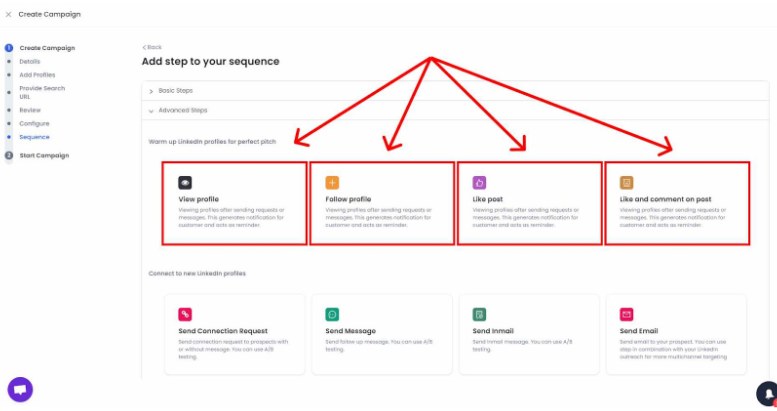
- If you choose the “Advanced Steps” option, you can warm up your LinkedIn account before sending connection requests. This makes your account look more legit and less like a bot.
Pretty cool, right? 🤔
Step 12: Time to craft your message and email
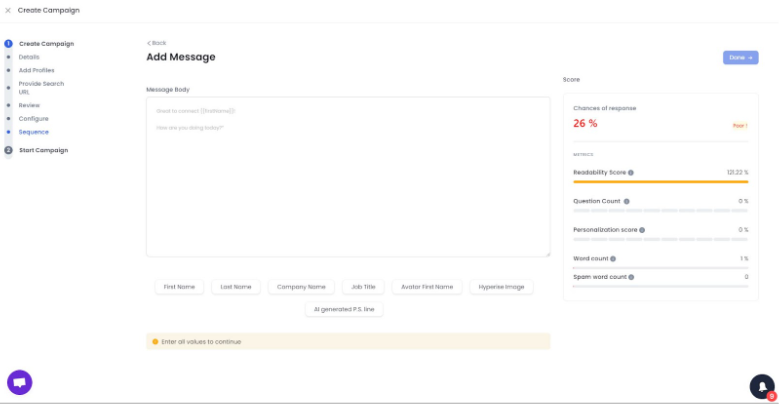
Here’s the best part: if you’re unsure about your message, SalesRobot has a built-in score system that shows how likely it is to get a response 🎯.
Worried about getting flagged? Just enable “Safe Mode,” and you’re all set.
No stress, no flags 🚦.
From there, SalesRobot will automatically reach out to 30-50 prospects daily from your lead list.
Easy peasy!

Now that we’re talking about it, you should know this:
Sales Navigator doesn’t allow you to export contact information directly.
That said, it still provides valuable insights from LinkedIn profiles that can guide your outreach.
However, there are other ways you can enrich your lead lists with contact info and save some time and effort.
There are several reverse lookup tools like Reverse Contact that let you upload lists and enrich it with the data they can find from public sources.
The good thing is you can easily download the list unlike Sales Nav, and run a campaign on SalesRobot with your CSV file.
Why SalesRobot Stands Out? 🤔
While Sales Navigator is a powerful tool for finding and engaging with leads, it's not a complete solution.
You're likely uploading a list of potential leads to Sales Navigator to enrich their profiles and leverage LinkedIn's network for outreach.
However, you might find that manually engaging with each lead through InMails and connection requests can be time-consuming and inefficient.
This is where SalesRobot can significantly enhance your efforts:
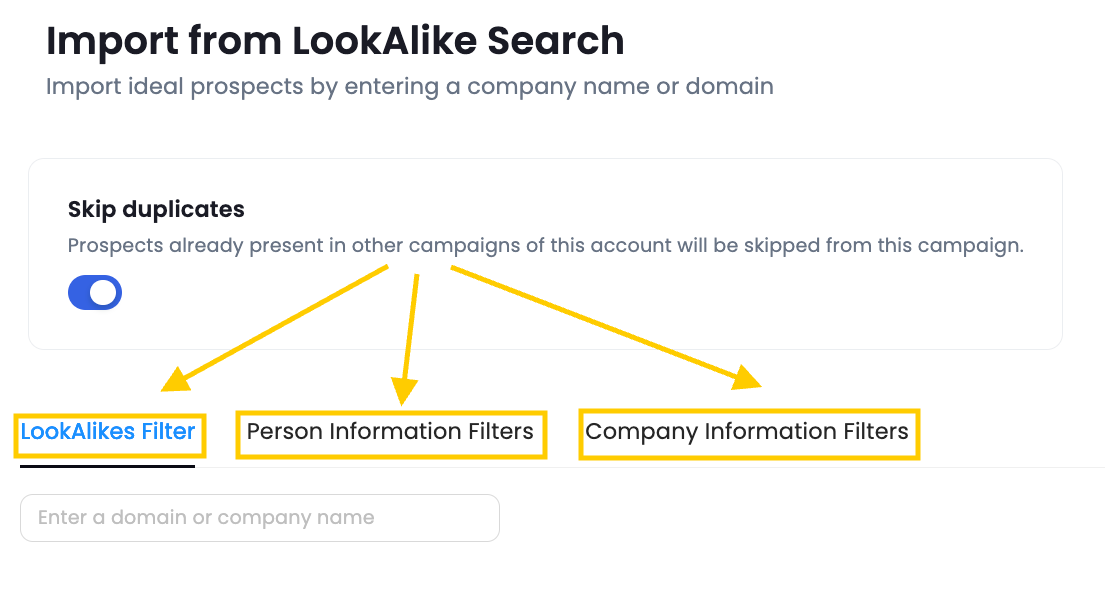
- SalesRobot's AI-powered lead generation can complement your Sales Navigator research. By identifying lookalike companies and enriching contact information, SalesRobot can help you expand your reach beyond your initial lead list and discover new, high-quality prospects.
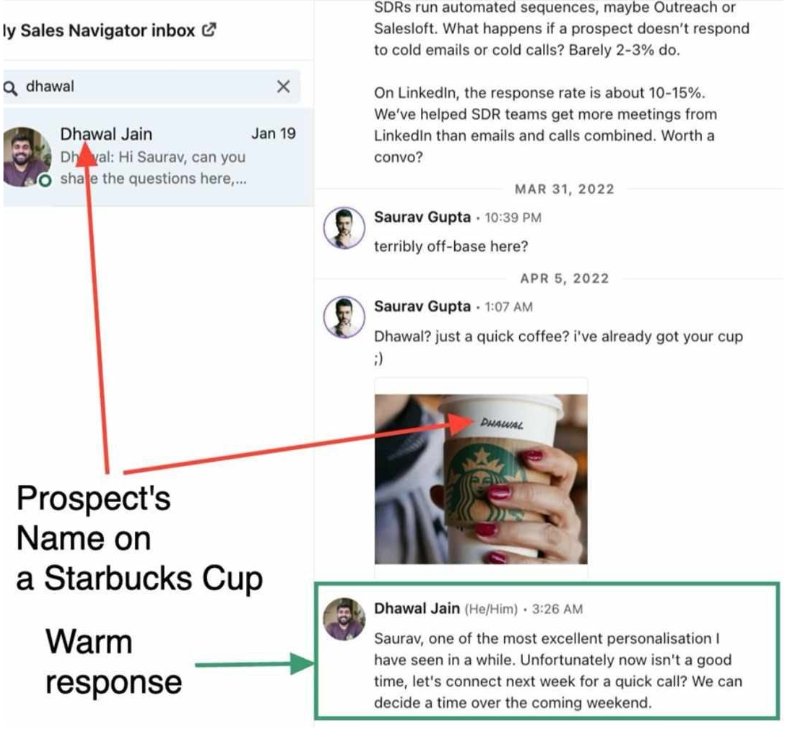
- SalesRobot's automated outreach capabilities can streamline your engagement efforts. Instead of manually sending countless InMails, SalesRobot can automate personalized messages, schedule meetings, and even follow up with leads, freeing up your time to focus on more strategic tasks.
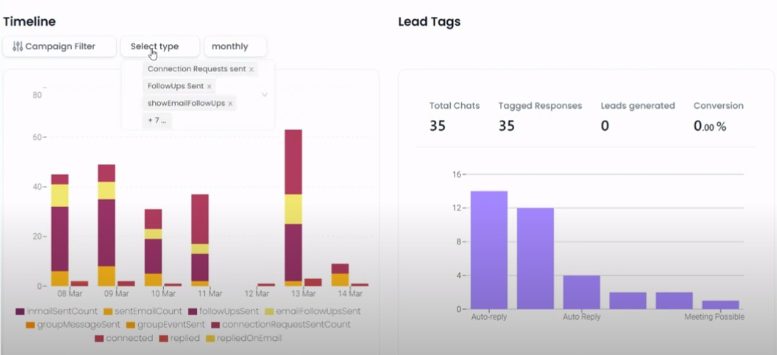
- SalesRobot's analytics can provide valuable insights into the effectiveness of your outreach campaigns. By tracking key metrics like open rates, response rates, and meeting schedules, you can identify which messages are resonating with your audience and refine your approach accordingly.
Essentially, SalesRobot can act as a powerful extension to your Sales Navigator workflow. By automating repetitive tasks and leveraging AI-powered insights, you can improve the efficiency and effectiveness of your lead generation and outreach efforts, ultimately driving better results.
What Are the Benefits of Uploading Lead Lists to Sales Navigator?
Uploading your lead list to Sales Navigator isn’t just a time-saver it’s a game-changer.
With LinkedIn’s advanced search filter, you can boost your outreach and make your efforts more effective.
Here’s a breakdown of why this matters:
1. Advanced Filtering and Targeting 🎯
Once your lead list is uploaded, you can use Sales Navigator’s advanced filters to refine your searches.
✅ Sort leads by company, job title, location, or even industry.
✅ Focus on your niche audience with precision.
This makes targeting the right people a breeze, saving you from wasting time on irrelevant leads.
2. Real-Time Data and Profile Updates 🔄
Since Sales Navigator is a part of LinkedIn, you get instant access to the most up-to-date information.
✅ Job changes? Promotions? New roles? You’ll know about them automatically.
✅ No more manual data updates LinkedIn keeps everything current for you.
This ensures your lead information is always accurate, giving you an edge in your outreach.
3. Structured and Organized Data 📂
With all your leads in one place, Sales Navigator helps you stay organized.
✅ Your team can easily access and manage leads directly from LinkedIn.
✅ Workflows become more efficient, and collaboration improves.
No more digging through spreadsheets or scattered notes everything is right where you need it.
By uploading your lead list to Sales Navigator, you’re not just managing your leads better, you're creating a streamlined system that enhances your team’s productivity and results.
Other Advanced Features Sales Navigator Offers
If you’re curious about what else Sales Navigator can do, don’t worry I’ve got you covered.
Aside from managing your lead lists, here are a few powerful features you’ll want to check out:
1. Recommended Lead Lists 🧑💻
Sales Navigator takes your preferences and previous searches to provide tailored lead recommendations.
✅Find potential leads that perfectly fit your niche.
✅Keep updating your lead preferences so Sales Navigator knows exactly what to suggest.
This feature ensures you’re always discovering fresh, relevant leads with minimal effort.
2. SmartLink 📊
Want to share content and track engagement? That’s where SmartLink shines.
✅Share your presentations or content through a trackable link.
✅See exactly who viewed your content, how long they spent on it, and which sections grabbed their attention.
It’s like having insights into your prospects’ interests without having to ask directly.
3. TeamLink 🤝
Collaboration just got easier with TeamLink.
✅See if anyone in your lead searches is directly connected to your teammates.
✅Get warm introductions through mutual connections, making outreach more personal and effective.
This feature helps you tap into your team’s network to build trust faster.
Why It Matters?
These advanced tools don’t just make your workflow smoother, they help you work smarter.
Whether it’s finding the right leads, tracking engagement, or leveraging your team’s connections, Sales Navigator is packed with features to help you succeed.
So, go ahead and make the most of it.
Your outreach game just leveled up!
Conclusion
Mastering Sales Navigator isn’t just about uploading lead lists, it’s about transforming how you manage and engage with prospects.
With advanced features like SmartLink and TeamLink, coupled with tools like SalesRobot, you’re equipped to turn raw data into actionable insights.
Take the time to optimize your CSVs, personalize your outreach, and leverage automation safely.
Success lies in consistent effort and thoughtful strategies.
Whether you’re streamlining workflows or expanding your network, Sales Navigator and its complementary tools make the process seamless.
So, ready to supercharge your lead generation? Start today, explore the possibilities, and watch your outreach strategy reach new heights.
Happy selling!

.png)

.png)