Are you facing troubles in..
☝🏼Building a strong sales pipeline?
✌🏼Finding and generating leads that convert?
Well, you're not the only one.
Every business wants to grow, but creating enough leads is a big hurdle for most.
Now, how can you be better and different from your competition?
Here’s — LinkedIn Sales Navigator.
With Sales Navigator you can:
💥Find ideal clients,
💥Build a solid sales pipeline, and
💥Grow your business.
For instance, when I started using Sales Navigator, my SaaS business went from $0 to $600K in annual revenue in just two years.
Imagine what it could do for you!
In this blog, we’ll cover:
✔️ What LinkedIn Sales Navigator is,
✔️ How it works,
✔️ How to use it to generate leads effectively, and
✔️ 6 proven best practices to maximize your results.
First, let’s start with the basics:
What is LinkedIn Sales Navigator?
LinkedIn Sales Navigator is a tool designed for sales professionals on LinkedIn.
This is a premium tool that provides access to over 10 million profiles and more than 30 filters that you can use to precisely target your ideal leads.
You can save leads to your list or CRM and keep track of your outreach easily and also find key decision-makers like CEOs or Founders within your target market.
So basically, it’s a simple way to make lead generation more focused and organized.
How does it work?
LinkedIn Sales Navigator offers advanced search features and tools to help you find and connect with the right leads.
Here's how it does that:
- Advanced Search: You can filter leads using over 30 different criteria, such as company size, industry, job title, and more. This allows you to narrow down your search and focus on the most relevant prospects.
- Lead Suggestions: Based on your preferences and previous interactions, Sales Navigator recommends leads that are most likely to be a good fit for your business, making prospecting easier.
- InMail Messaging: You can reach out to potential leads directly through InMail, even if you're not connected. This feature increases your chances of starting a conversation with decision-makers.
- CRM Integration: Sales Navigator syncs with your CRM, allowing you to automatically add leads and track your outreach efforts, so you can stay organized and efficient.
- Sales Insights: It provides real-time updates on your leads’ activity, so you can monitor engagement and adjust your approach accordingly to improve your outreach strategy.
And just so you don’t say later that I didn’t warn you,
Just getting a premium LinkedIn tool isn’t gonna ensure that you’ll start getting leads on your own.
“Okay.. so then what will?”
Relax, check this next section out to know:
How to use LinkedIn Sales Navigator to generate leads?
- Using advanced search filters
LinkedIn Sales Navigator offers 30+ filters that allow you to find your ideal clients.
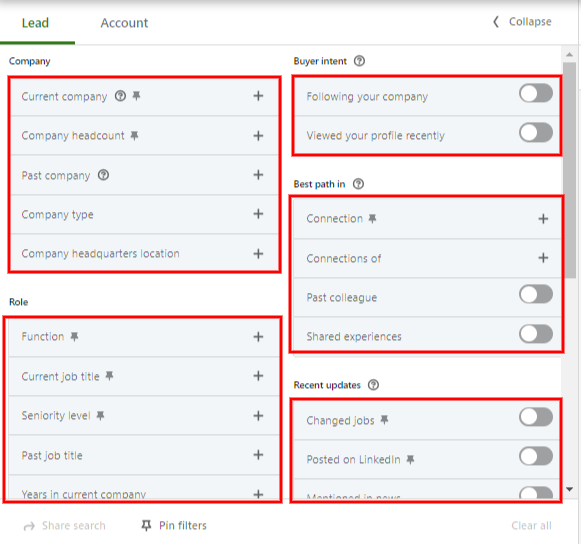
These filters cover company details, job functions, and even recent activities like job changes or news mentions.
For example:
You can use the “Spotlight” filters to find prospects who recently switched jobs and start a conversation based on that.
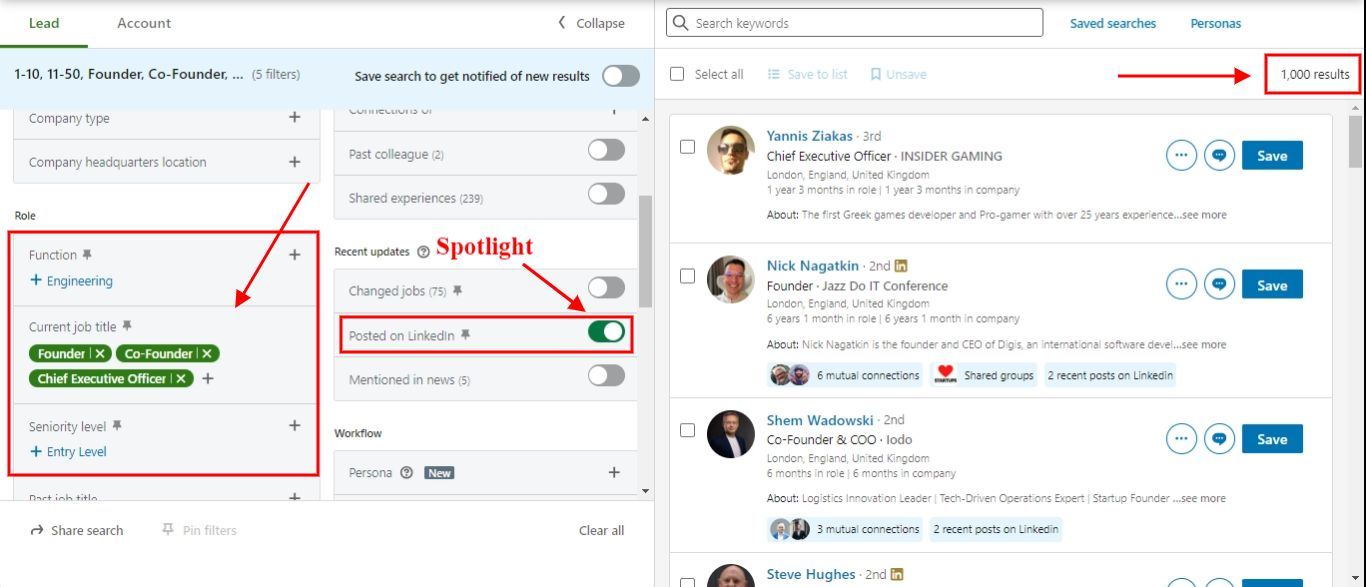
This level of precision helps you connect with the right people faster.
- Using Boolean search
You can use Boolean search with Sales Navigator: using logical operators and punctuation to create targeted, highly specific searches.
This allows you to filter your results to find exactly the type of prospects you need.
Boolean search works by combining operators like AND, OR, NOT, parentheses, and quotation marks to structure your queries.
You can apply Boolean search in two main places on Sales Navigator:
- The Keyword Search Bar: This searches for your specified terms across a prospect's entire profile, including sections like their headline, summary, skills, current roles, past roles, and education.

- The Job Title Filter: This focuses exclusively on current job titles, allowing you to target specific roles.
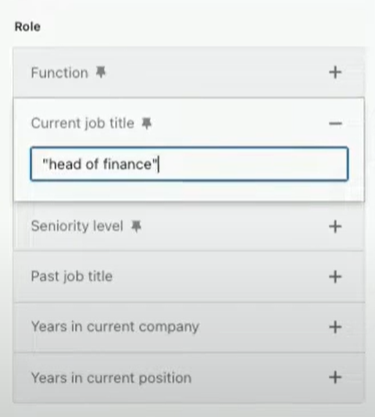
Let’s see how Boolean operators work:
- Quotes are for finding exact phrases (e.g., "Marketing Manager").
- AND ensures all included terms appear in results (e.g., Marketing AND SaaS).
- OR broadens the search to include any of the terms listed (e.g., "Sales Manager" OR "Account Executive").
- NOT excludes certain words or phrases (e.g., "Product Manager" NOT "Intern").
- Parentheses combine multiple operators, ensuring clarity (e.g., ("VP Sales" OR "Director Marketing") AND SaaS NOT Consultant).
And here’s how you can structure a Boolean query to find decision-makers:
- Start by listing terms such as "VP" or "Director".
- Add function-related terms like "Sales" or "Marketing".
- Exclude irrelevant roles (e.g., Intern, Assistant, or Founder).
When combined, a Boolean string might look something like this:
(“VP” OR “Director” OR “Head”) AND (“Sales” OR “Marketing”) NOT (“Intern” OR “Assistant”)
This query will target senior professionals in sales or marketing while excluding junior roles or founders.
- Creating lead lists
Once you’ve identified potential leads, you may want to save them in lists.
Here’s how you can create one:
- Select leads with checkboxes
- Click on “Save to List”

- Click “+”

- Give a name to your list.

You can access these leads through the “Lead List” tab after you’ve saved them.
- Exporting leads from Sales Navigator
Sales Navigator is a great tool for finding leads, but it falls short when it comes to exporting them into a CSV, which makes it challenging to upload them to your CRM.
But I never show up without a solution, do I?
Here it is:
With SalesRobot, you can export up to 2,500 leads at a time, complete with their contact details like emails and phone numbers, directly into a CSV file—saving you time and effort.
Here’s a quick guide on how to do it:
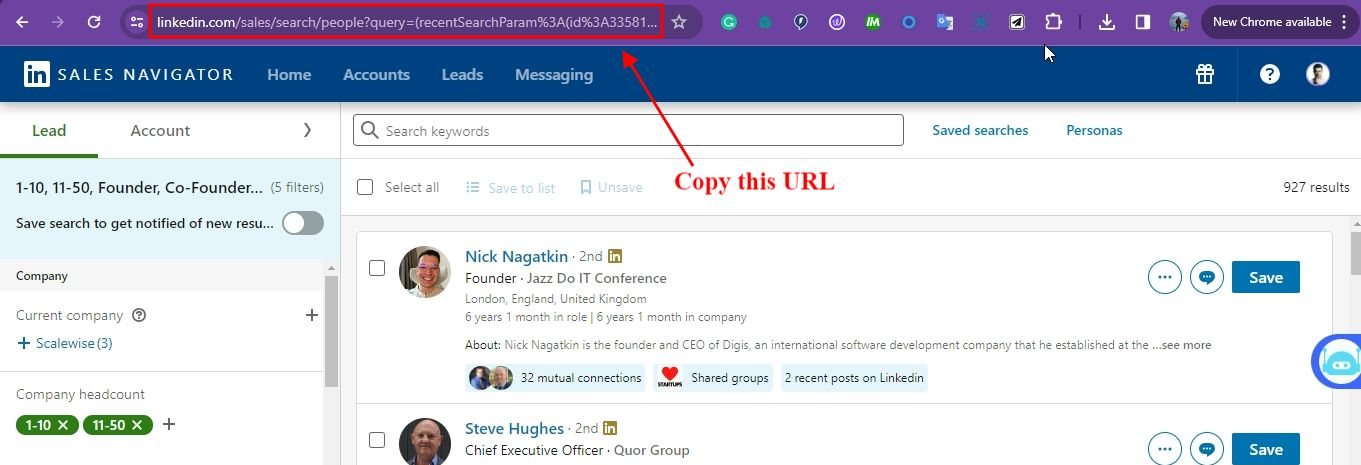
- Copy the URL of your saved list in Sales Navigator.
- Log in to SalesRobot, go to “Campaigns," and select "Create campaign."

- Choose “I’m an advanced user", give a name to your campaign and click “save”.

- Select “Add from Sales Nav Search” and paste the URL of your sales nav search.

After this, you’ll have a list of prospects you want to target in your campaign.
- Now all you need to do after you create your campaign is, go back to the campaigns page and:

- Now select “Export as CSV” (wait 24 hours for the list to be scraped)

And you’re all set!
Within 24 hours, your prospects will be exported into the platform with all their details: First Name, Last Name, Company Name, Seniority, Country, Email, Profile URL, phone number, and more.
If you have more than 2,500 leads, just break your search into smaller lists using Sales Navigator’s filters.
- Sending personalized connection requests
Once your leads are imported, the next step is sending out connection requests.
Personalizing each one manually can be time-consuming and SalesRobot simplifies this too for you.
It lets you send personalized connection requests, followed by messages like these:
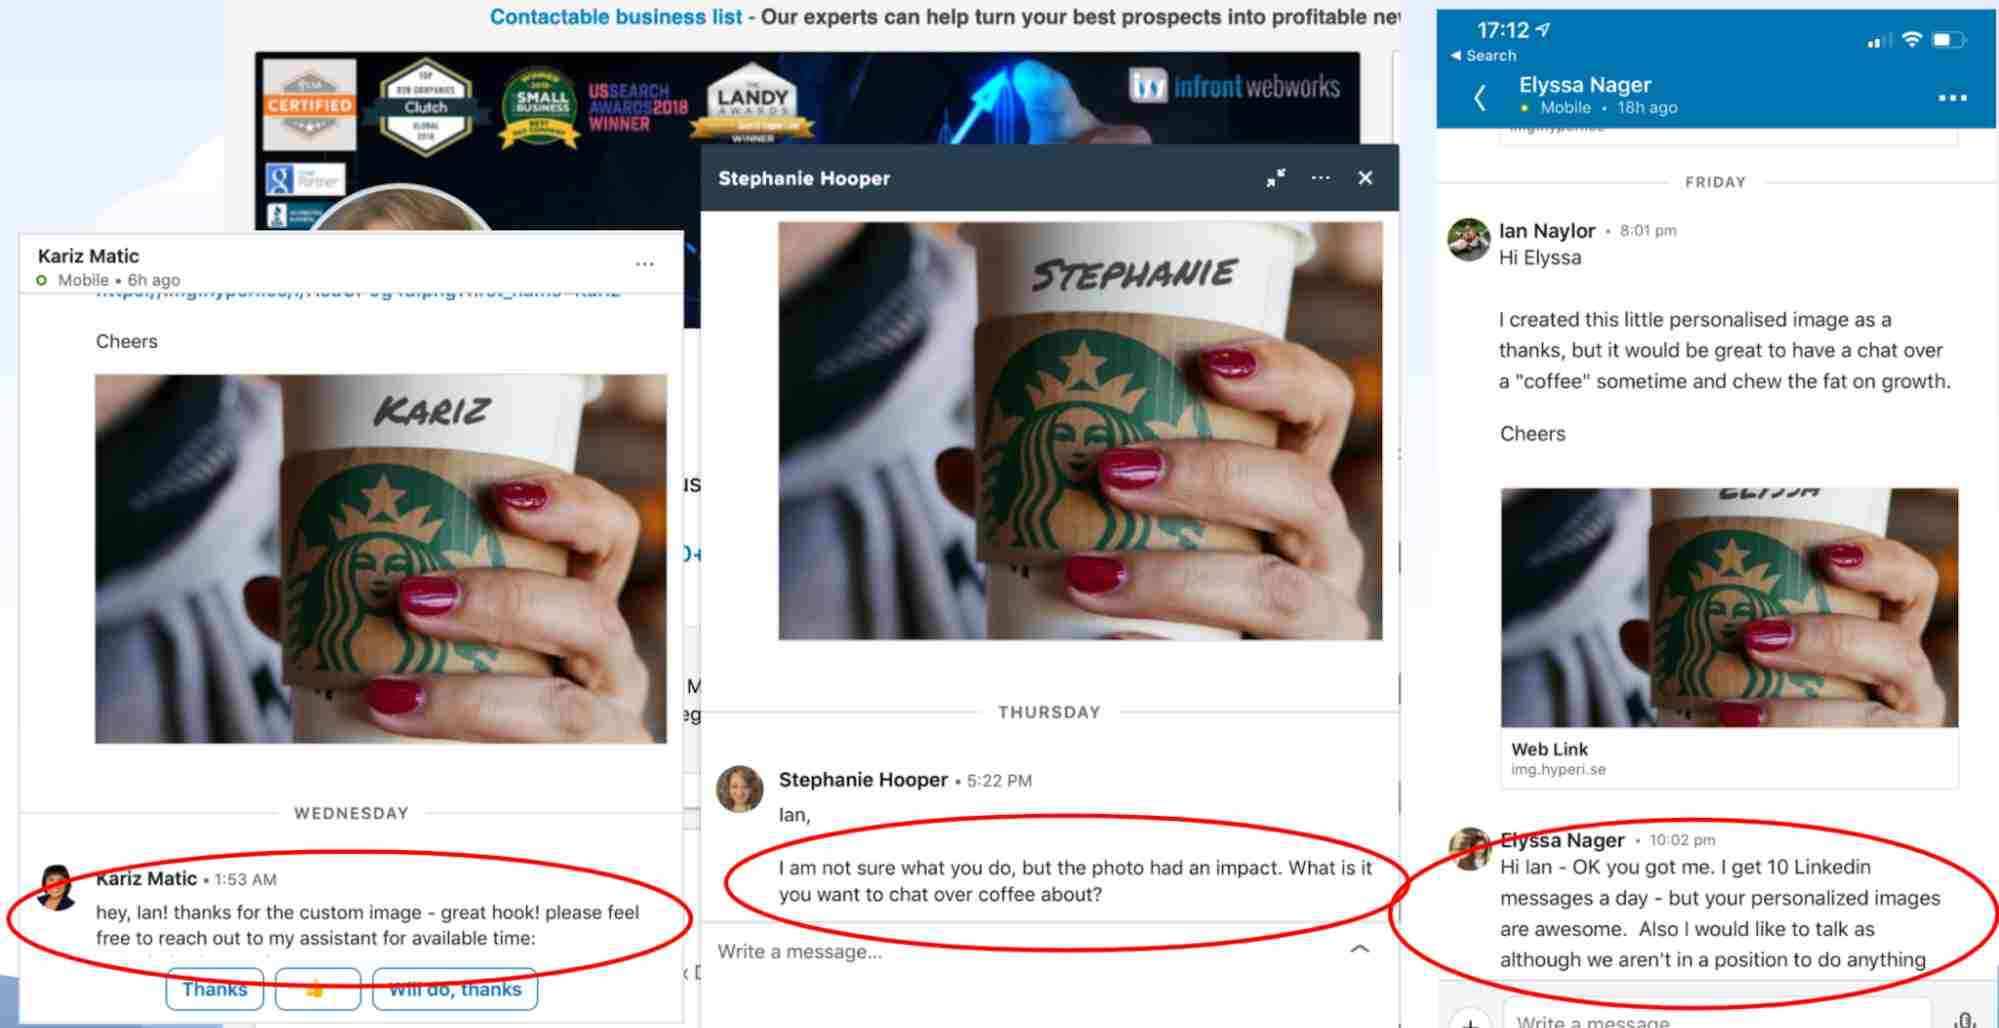
You can add memes, gifs, and images, helping you build genuine connections that convert.
- Automate your follow-ups
Sales Navigator is great for prospecting but doesn’t offer automated follow-up capabilities.
But don’t worry, SalesRobot can handle that for you too.
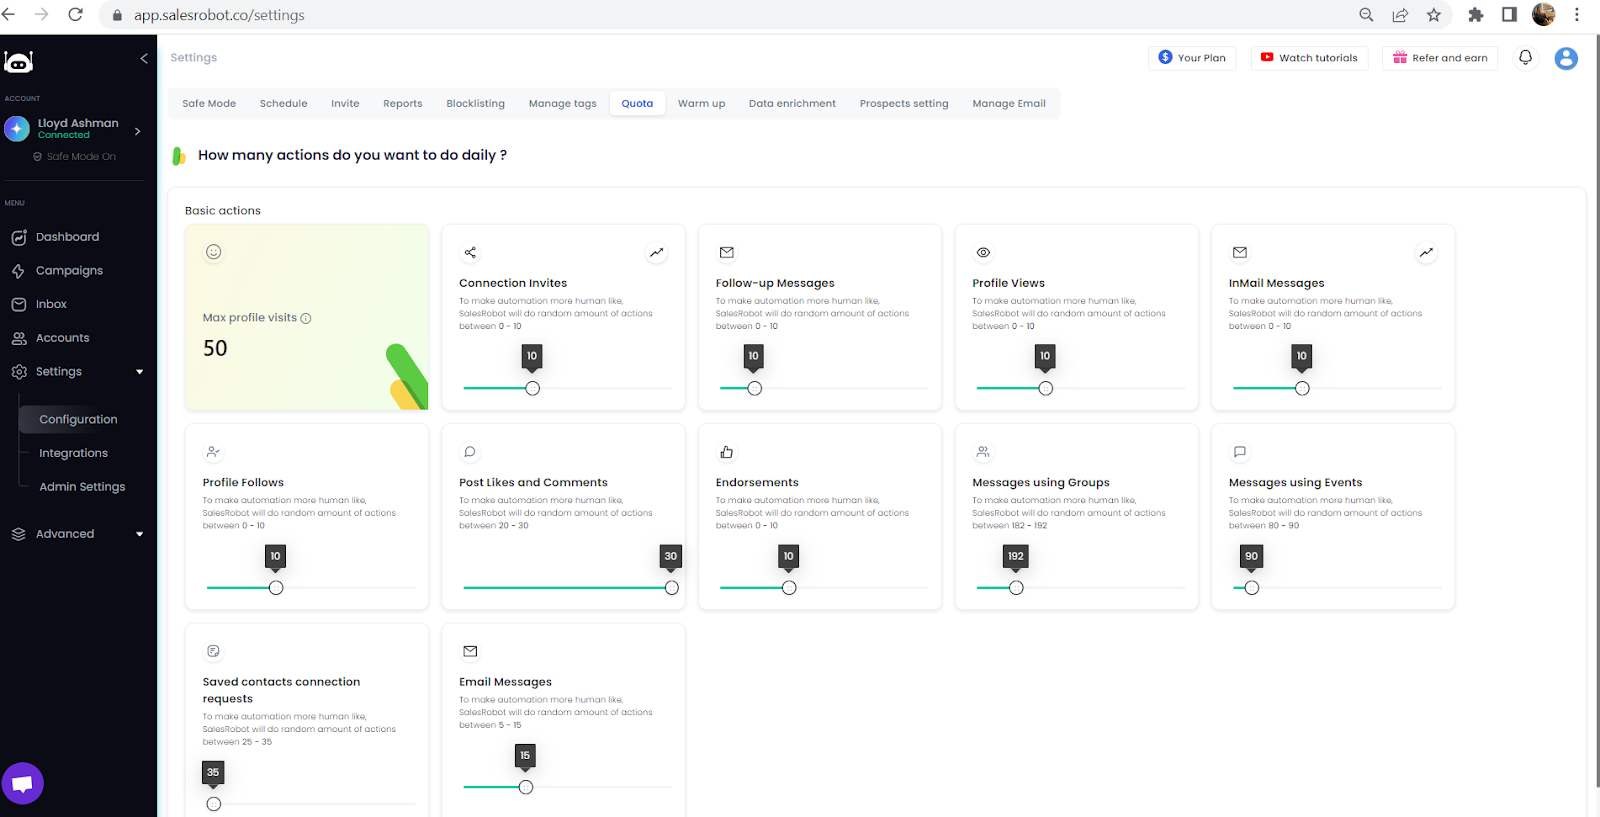
Apart from sending super cool personalized messages to people, it can also follow-up with them on a schedule you set, on autopilot!
You can send up to 50 connection requests and InMails per day, and you have complete control over customization and pacing.
Wanna learn how?
See this:
https://salesrobot.crisp.help/en/article/step-2-how-to-create-a-sequence-bwdqja/
- Sending free InMails
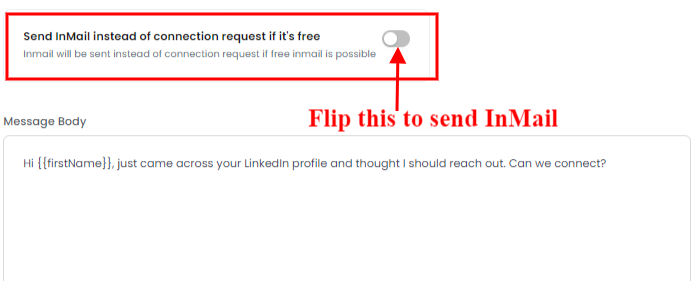
Sales Navigator provides 50 InMail monthly credits, allowing you to message people you aren’t connected with.
If a profile doesn’t accept InMail, you can’t contact them directly unless you’re connected to them or use a tool like SalesRobot.
SalesRobot lets you send connection requests as an InMail alternative for premium profiles.
To scale your outreach beyond 50 credits a month, leverage LinkedIn groups and events to connect with your target audience.
Here’s my approach to bypass the connection limit and reach over 700 prospects weekly.
- Engage Consistently with Your Leads
Manually reaching out or using generic messages won’t scale your business effectively.
To succeed, you will need:
Automation + Personalization + Sales Navigator
Using LinkedIn Sales Navigator combined with SalesRobot allows you to prospect your dream clients in volume and solve two key issues:
- Consistent Lead Generation: Get a steady flow of leads.
- Time Savings: SalesRobot personalizes messages, boosting reply rates and saving you hours.
So, if you’re even a tiny bit interested,
You can try it free for 14 days—no credit card or phone number needed.
Just sign up and start using it!
Now that you know how to use Sales Nav for lead generation, here are:
6 Best Practices for Using LinkedIn Sales Navigator
LinkedIn Sales Navigator is a great tool for finding and connecting with potential leads.
However, like any other tool, it’s not perfect.
Filters can mislead, data can be outdated, and relying too much on default settings can hold you back.
By following these best practices, you can use Sales Navigator effectively without falling into common traps.
1️⃣ Don’t overdo filters
LinkedIn Sales Navigator’s advanced filters are good, but they’re not great..
Because, if you overuse them, you’ll end up with a very narrow and weird list of prospects.
Filters like "Seniority" and "Function" can be highly misleading.
For example, "Function" might list people in "Marketing," but what about people with "Growth" or "Demand Generation" in their titles?
They may not be included even though they play key roles in marketing.
A smarter approach is to focus on job titles, location, and company size.
For example, instead of selecting "Marketing," search for specific roles like "Head of Growth" or "Lead Gen Manager."
This will find people whose roles don’t fit LinkedIn’s predefined categories.
2️⃣ Watch out for people with multiple job roles
On LinkedIn, some people have more than one current job role listed on their profile.
For example, someone might be listed as "Founder" of one company and "Consultant" at another.
When you rely on filters like "Current Title," you might miss these people since LinkedIn can get confused by the multiple roles.
This is a common issue with freelancers, consultants, and people who work in startups.
3️⃣ Avoid Using the Industry Filter (Use SalesRobot’s AI lookalikes instead)
The "Industry" filter on Sales Navigator might seem like a great way to narrow down prospects, but it’s not always super accurate.
The reason is that many companies don’t categorize themselves correctly.
Like, sometimes a software company that sells to healthcare providers might list its industry as "Healthcare" instead of "Software."
If you only search for "Software" industry leads, you’ll miss companies that are clearly relevant to you.
Instead, you can skip Sales Nav altogether and use SalesRobot’s built-in database of 800M LinkedIn profiles.
You just have to enter the website of your favorite client and SalesRobot will find more like them.
4️⃣ Boolean search
While Boolean search strings can help you get filtered results, they’re not foolproof either.
Overly complex queries or poorly chosen keywords can exclude potential leads who use different terminology.
For instance, searching for “Sales AND Manager” might miss someone with “Revenue Lead” in their title, even though their role aligns with your target.
To avoid this, experiment with variations of your search terms and test shorter Boolean strings.
5️⃣ Avoid the technology filter
The technology filter on Sales Navigator might be useful sometimes, but it’s not 100% reliable.
LinkedIn doesn’t always have up-to-date information about the tools companies use.
Instead of relying on this filter, look for job roles that suggest certain tools are being used.
For example, if a company has a “Data Analyst,” they might be using tools like Power BI or Tableau.
6️⃣ Use the keyword filter wisely
And at last, if you search for a generic keyword like "Sales," you’ll end up with too many irrelevant results.
The trick is to use more focused, specific keywords.
For example, instead of searching for "Sales," try "Outbound Strategy" or "Account-Based Marketing."
These are niche phrases that directly relate to specific roles or pain points.
When you use precise keywords, you’ll get results that are more aligned with what you offer.
Because, people who mention specific strategies in their profiles are often more experienced, making them better leads.
Is using LinkedIn Sales Navigator enough for prospecting?
So, now you know how to make the most of LinkedIn Sales Navigator.
It's an amazing tool for finding and connecting with your ideal prospects, ngl.
You can use its advanced search to filter by company size, job title, and industry, helping you pinpoint the perfect leads.
Plus, the Lead Recommendations and real-time insights make it easier to stay on top.
But but but but…
Here’s the thing,
While Sales Navigator helps you find leads, it doesn’t handle the automation side of things.
❌You can’t automate connection requests,
❌Can’t send personalized messages at scale, and
❌Can’t manage outreach across different time zones.
But you don’t have to worry about this stuff.
SalesRobot is here to help.
It takes care of all that for you, helping you reach out to prospects without the boring manual work.
With SalesRobot, you’re gonna get the best of both worlds — Sales Navigator’s advanced search and SalesRobot’s automation to scale your outreach.
It’s simple, it’s effective, and it makes your LinkedIn prospecting a whole lot easier.
And c’mon, its pricing starts at only $99/month.
Yes, ONLY.
But okay, if you don’t want to commit, give it a try with our 14-day free trial – no credit card required.
See ya!

.png)
